
Kurta Pyjamas for Men
Making Kurta pajamas for men.
|
What is a Kurta pajama for men? How do Kurta pajamas for men look? What fabrics are required for Kurta pajamas for men? What colors are suitable for Kurta pajamas for men? What are various sizes of Kurta pajamas for men? What extra work can be done for Kurta pajamas for men? How do you take measurements for Kurta pajamas for men? What resources and supplies are required to make one Kurta pajama for men? What steps are required to make one Kurta pajama for men? pajamas = pyjamas | ||||||||||
|
Basic features of men's kurta pajama The basic design of this kurta pajama entails a loose-fitting shirt that reaches the knees. This is usually paired up with a bottom which is fastened by drawstrings, and which is referred to as the pajama. In some cases, the pajama is also known as the churidar. The resulting ensemble, when paired with men's sandals, makes for a simple yet classy look. For a casual approach, the kurta pajama can be paired up with sneakers for men which are also available at ________. With the option of switching from casual to classy, the inclusion of men's sandals and sneakers for men works perfectly well. Made from cotton, the kurta pajama men's dress ensures one remains comfortable even during the hot season. What's more, its loose-fitting design is endearing for many men looking for comfortable yet classy clothing. Latest kurta pajama designs also incorporate different embellishments mainly incorporating sequins, beads and crystals for the ________ man. Size Size 32 Size 34 Size 36 Size 38 Size 40 Size 42 Size 44 Size 46 Size 48 Size 50 Size 52 Color Beige and Brown Black and Grey Blue Gold Gold-Silver Green Multicolor Orange Pink and Majenta Purple and Violet Red and Maroon Silver White and Off White Yellow Fabric Banarasi Brocade Chanderi Chiffon Cotton Imported Jacquard Jamawar Jute Khadi Linen Poly cotton Raw Dupion Silk Satin Shimmer Silk Silk cotton Tussar Silk Velvet Work Aari Border Broches Bugle Beads Cut Dana Fancy Work Floral Kasab Kundan Lace Machine Embroidery Moti Patch Pleats Printed Resham Sequence Stone Thread Valvet Zardozi Zari Zircon Men Apparel - Kurta & Sherwani - Standard Size Chart
The standard clothing size chart for traditional kurta pajama for men is based on the chest measurement of the kurta. Sherwani suits generally have about 1.5 to 2 inches less in chest size as they are a bit tight fitting and Shalwar Kameez are about 1.5 to 2 inches more in chest size as they are lose fitting. Men's _________ Kurta Tutorial Hello! This is the beginning of my first tutorial :) These are the directions for making a tunic, specifically an _______ Kurta, but you could adapt it for any tunic top. These are the supplies you will need: Fabric marker or chalk, pins, yardstick, 4 1/2 yards of fabric (and 4 1/2 yards of lining if you want to line it), thread, scissors, sewing machine, and machine embroidery floss (if your machine has an embroidery feature). Begin by taking these 4 measurements: Shoulder to knee=_____, then add 1" Shoulder to wrist=_____, then add 3" Shoulder to hip=_____ Hip measurement=____, then add 5" (measure around largest part of hips.....really fun:) So as an example my hubby's measurements were: 1. 46" 2. 27" 3. 26" 4. 48" Step 1: Find a loose fitting t-shirt to use as your pattern for the bodice. Fold your fabric, selvages together - then fold the t-shirt in half, and lay it on top - the fold of the t-shirt should line up with the fold of the fabric. Trace with fabric pen around the front neckline, shoulder seam, and armhole.  Step 2: Remove the t-shirt. Measure from the shoulder seam straight down to the hip (measurement #3) - in Ryan's case, 26 inches. Make a mark with a fabric pen. Take the hip measurement (measurement #4) and divide it by four. At the mark measured from the shoulder seam, draw a line from the fold 1/4 of your hip measurement. In Ryan's case, I measured from the fold, 12 inches. Next measure from the shoulder seam to the knee (measurement #1) , in Ryan's case 46 inches. Make a mark. At that mark, measure from the fold 1/4 of the hip plus two or three inches (depending on the flare you want in your tunic) - I added two inches, so I measured straight from the fold 14 inches. Then connect the bottom of the arm hole, to the 12" mark all the way down to the 14" mark. It should look like this (the colors of the lines in this picture correspond to the colors in the directions): This is the front of your tunic.  Step 3. Cut out the front, and lay it on top of the fabric for the back(still folded in half ) with the front fold matching the fabric fold. You can use the front as a pattern for the back. It will be the same, except for the neckline, which barely needs to curve at all - you can use the back of your t-shirt if you need to - this is a picture of the front laying on top of the back showing the difference in necklines:  Cut out the back, and now you are ready to cut the sleeves. Step 4: Open the back and front pieces and lay them on your fabric, shoulder seam to shoulder seam. Use the curve this creates as a pattern for the top of your sleeve. Trace the curve of the armhole onto your fabric. Next, measure from where the shoulder seams meet, straight down your fabric, the length of your arm ( measurement #2): Ryan's was 27". Make a mark there.  Step 5: Draw a 14" line at that mark, making sure that the center of that line is even with the center of your sleeve top. Next, draw two diagonal lines, one from each side of the 14" line, to the bottom of the armholes. It should look like this: 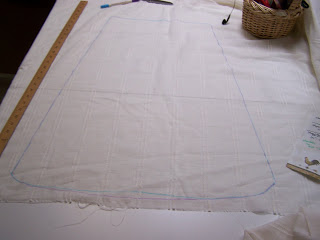 Cut out another sleeve by this same pattern. So now your entire tunic is cut out. I chose to line Ryan's tunic. If you want to do that, just use these pieces as your pattern, and cut out the exact same pieces from the lining fabric. Step 6: With right sides together, sew your shoulder seams together front to back. Open and press. Cut a straight slit, about 4" long in the center of the front piece neckline- this will allow it to go easily over the head. Now is the best time to do any embroidery around the neckline. Since my fabric was very thin, I used some register tape on the back of my fabric as a stabilizer and then ripped it off when I was finished embroidering. 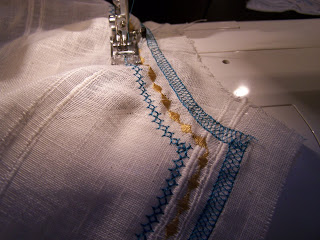 Step 7: Once you have finished your embroidery, pin together the neckline of your lining and outer fabric, right sides together. 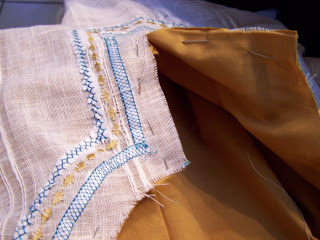 Step 8: Stitch around the neckline using a 1/2" seam. Clip the corners, and turn right side out and press. Now it is time for the sleeves! Step 9: Right sides together, pin the curve of the sleeve to the armhole - if you lay it out, the sleeve should lay under the bodice like this: 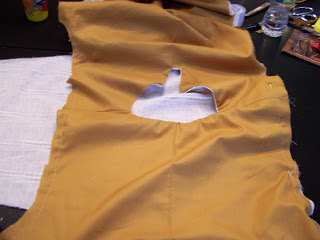 Step 10: Stitch arould the armhole using a 1/2" seam. Repeat on the other side. Press the seam toward the bodice. When you turn it right side out it should look like this: 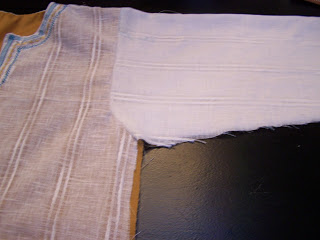 Step 11: Right sides together, pin from the wrist all the way down the sleeve seam and side seam. Stop when you get to the point you want the slits to come to. My slits came up about 12 inches from the bottom of the garment.  Step 12: Sew together using a 1/2" seam. Repeat for the other side. You're almost done! Turn right side out and press. Step 13: Press the raw edges of your slits in 1/4" and topstitch in place. If you lined it, press the lining toward the outer fabric and topstitch them together. Try it on and pin up the hem. Press it - I hemmed it about an inch. Topstitch the lining to the outer fabric. Repeat in the back. 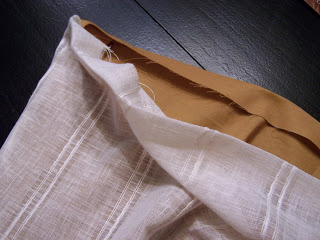 Step 14: Try it on and pin the sleeve hem to the length you desire. Press it under and topstitch the sleeve hem. If you would like to add any embroidery to the sleeve you can do it now. And that is it! congratulations - you finished it! Have fun and don't be too much of a perfectionist! |