
Sewing Machines
|
Sewing machine manufacturer
Q. What should you know about a sewing machine? Q. How is a sewing machine manufactured? Here are important guidelines. | |||||||||||||||||||||||||||||||||||||||||||||||||||||||||||||||||||||||||||||||||||||||||||||||||||||||||||||||||||||||
|
Q. What are the sewing machine models according to the year of manufacture? 1990 - present 1970 - 1989 1960 - 1970 Before 1960 Earliest Machines | |||||||||||||||||||||||||||||||||||||||||||||||||||||||||||||||||||||||||||||||||||||||||||||||||||||||||||||||||||||||
|
Q. Do you really need a simple one or an advanced computerized one? Q. Will you be using it for embroidery? Q. Do you need a lighter and portable one? Q. What's the best sewing machine? Q. What functions do you need on your sewing machine? In the early 1800s, clothing was made by hand, families sewed their pants, shirts, and dresses using a needle and thread. Textile companies have many machines to choose from, including streamlined models specifically designed to sew one particular product. | |||||||||||||||||||||||||||||||||||||||||||||||||||||||||||||||||||||||||||||||||||||||||||||||||||||||||||||||||||||||
|
Sewing Machine Troubleshooting Guide Tension Problems Breaking Needles Breaking or Shredding Needle Thread Breaking Bobbin Thread Skipped Stitches Fabric Won't Feed Properly Thread Nest | |||||||||||||||||||||||||||||||||||||||||||||||||||||||||||||||||||||||||||||||||||||||||||||||||||||||||||||||||||||||
|
Machines Materials Needles Patterns Threads | |||||||||||||||||||||||||||||||||||||||||||||||||||||||||||||||||||||||||||||||||||||||||||||||||||||||||||||||||||||||
Every new sewing machine will come with an owner's manual. If you are buying a used machine, look online for a manual. It is very likely you can find an owner's manual for your machine free or for a low cost online. This manual will save many hours of questions and trying to fix problems that should only take a few minutes if you know what to do. Most manuals will have a diagram of the sewing machine and needle area identifying the various parts. When you know the parts of your machine, you can follow the instructions much easier. There are some parts on all sewing machines that will be the same. This makes using multiple machines much easier. Each machine will have a thread take-up lever. This lever will control the thread while it is being fed through the needle. It will move up and down as the machine works. The tension disc will give the thread the right amount of tautness for the type of fabric you are sewing. Normally, there will be a table in the manual that will tell you what setting the tension disc should be on depending on the fabric you are using. The pressure foot will hold the fabric down as it passes under the needle. You will have to use a lever called the pressure foot lifter to raise it to get the fabric under the pressure foot. The needle plate is the flat part that is under the pressure foot and has a hole that the needle can go through. In the middle of this plate are the fabric feeds. They will move your fabric forward under the needle. The needle is held in place by the needle clamp or screw. This is loosened to change the needles. On the top of every machine there is a spool pin. This is what will hold your spool of thread. Next to it will be a bobbin spindle. You use this part to put thread on your bobbins to match the thread on your spool. On the right side of your sewing machine will be the balance wheel. This is used to control the needle, making it raise or lower. There will also be a light that will shine on the needle plate and help you guide the fabric through in the correct manner. Some machines have a switch for this light and on other machines the light will come on clear pixel automatically. If the bulb burns out, check your sewing machine manual to be sure to get the correct replacement bulb. The foot pedal will control the speed of your machine. It plugs into your sewing machine and also an electrical outlet. You put this on the floor and use your foot to operate it. The operation of this pedal will be very similar to the gas pedal of an auto. The harder you push, the faster your machine will run. On a few machines, you will find a knee pedal instead of a foot pedal. These work much the same way. There are a few things which will need to be adjusted. The settings will depend on the fabric you are using and the needle you are sewing with. Your manual will give you the settings you will need to successfully finish your projects.  Shank The top part of the needle. It is flat on back and rounded in front to help position it perfectly in the needle bar on your sewing machine. It is the thickest and heaviest part of the needle. Shaft The narrow long portion of the needle. Groove The groove is to guide and protect the needle thread down to the eye. The groove is on the front of your sewing machine needle. You can feel it with your fingernail. Scarf This is the flat part or indentation on the back side of your needle just above the eye that supports the hook as it picks up the sewing thread loop to form your stitch. Eye That's where the thread feeds through to form a stitch. Point Points are either sharp or ball or a combination of both. These should be matched to your thread and fabric choices. 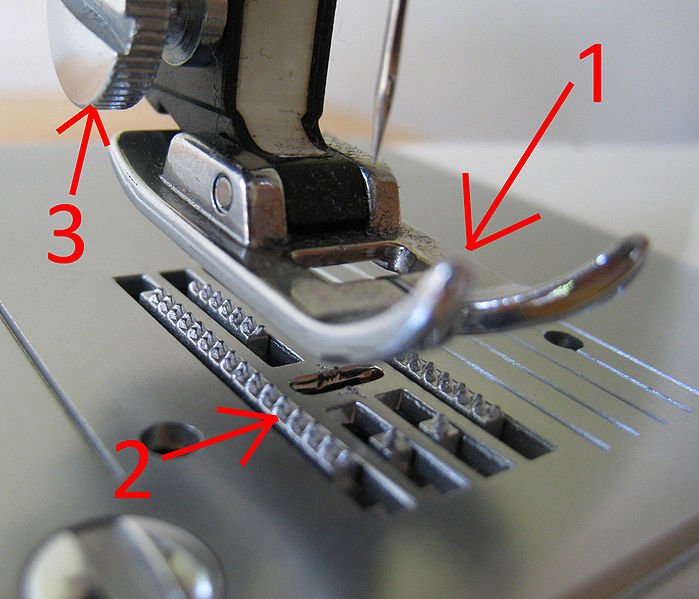 1. The presser foot 2. The rough-edged surface - some people call it the feed dog. 3. Thumbscrew for removing the presser foot Parts of a Mechanical Sewing Machine 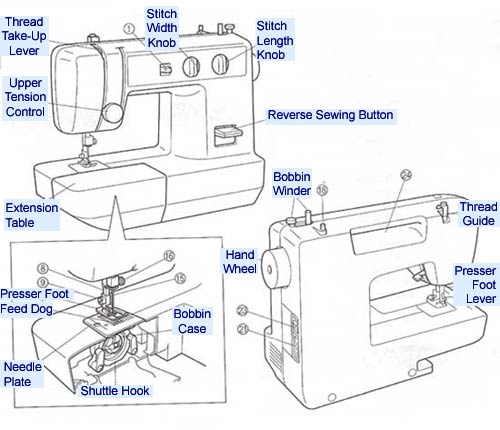 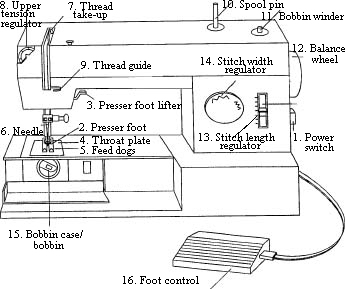 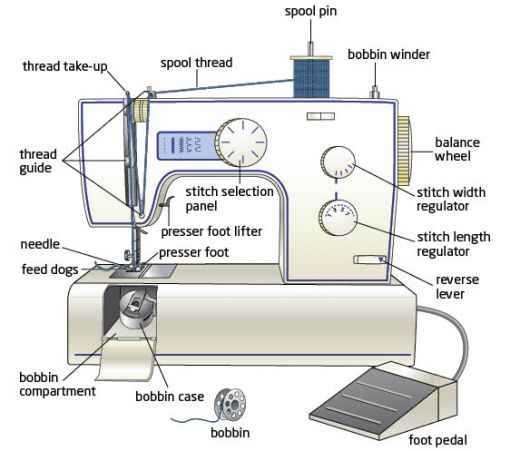 Sewing machine diagram Terms used to describe parts of the sewing machine Head - The complete sewing machine without cabinet or carry case. Bed - The flat surface of the sewing machine. A flat bed machine has one level to sew on. A free-arm bed has a removeable U-shaped part of the bed to reveal an arm or tub used for sewing hard-to-reach areas like a pant cuff or sleeve. Hand wheel - the wheel located on the right side of the sewing machine. This wheel is driven by the motor, but may be turned by hand to adjust needle height. Bobbin Winder - Mechanism used to wind bobbins. Bobbin - Low spool that provides the lower thread. Thread take-up - Arm that pulls up slack in thread. Thread guide - Device which carries thread to a certain location. Upper tension - Mechanism which controls delivery of upper thread. Lower tension - Provided by the bobbin case. Controls delivery of the bottom thread. Bobbin Case - Device which hold the bobbin and provides tension to the lower thread. Pressure Foot - Foot that presses down on fabric to stabilize its movement. Feed Dog - Mechanism which controls motion of the fabric. Needle Plate - Plate under pressure foot with slots to allow feed dog to reach fabric and openeiong for the needle to move up and down. Hook - Device which picks the thread off of the needle. Feed drop - Adjustment used to take the feed dog out of play for free hand work. Stitch length - Adjustment used to determine length from front to back of the stitch. Stitch width - Adjustment which allows a variety of widths from side to side. | |||||||||||||||||||||||||||||||||||||||||||||||||||||||||||||||||||||||||||||||||||||||||||||||||||||||||||||||||||||||
 What are the uses of an industrial sewing machine? Industrial sewing machines are used for the following items: | |||||||||||||||||||||||||||||||||||||||||||||||||||||||||||||||||||||||||||||||||||||||||||||||||||||||||||||||||||||||
|
Are you a sewing machine manufacturer? Would you like to advertise your products and services? What do you have to do? 10 sewing machines for an advertisement. | |||||||||||||||||||||||||||||||||||||||||||||||||||||||||||||||||||||||||||||||||||||||||||||||||||||||||||||||||||||||