
| Admissions | Accreditation | Booksellers | Catalog | Colleges | Contact Us | Continents/States/Districts | Contracts | Distance Education | Emergency | Examinations | Forms | Grants | Hostels | Honorary Doctorate degree | Investment | Instructors | Lecture | Librarians | Membership | Professional Examinations | Programs | Progress Report | Recommendations | Research Grants | Researchers | Students login | School | Search | Seminar | Study Center/Centre | Sponsorship | Tutoring | Thesis | Universities | Work counseling |
|
What items do you need to establish peripheral intravenous access? When is peripheral intravenous access required? What are the types of IV catheters? What are age-specific IV catheter requirements? What are the different type of intravenous fluids for human needs? What potential sites should you utilize for human peripheral intravenous access? How should the patient be positioned during peripheral intravenous access? When should you start an on-the-spot intravenous line? What items do you need to establish peripheral intravenous access? 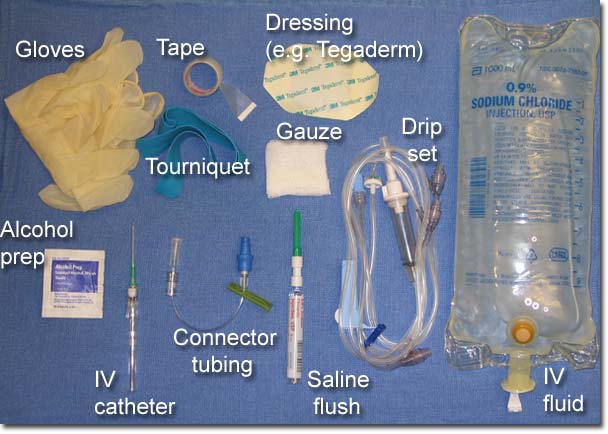
List of Required Items * Gloves * Alcohol prep * Torniquet * Intravenous catheter * Connector tubing * Drip set * Saline flush * Dressing (such as Tegaderm) * Tape * Gauze * IV fluid When is peripheral intravenous access required? Diagnostic indications Therapeutic indications Contraindications What are the types of IV catheters? Catheters Basic Components | Catheter Size | Safety Features Basic Components There are several basic components to IV catheters. The metal needle has a beveled tip and is used to the enter the vein. The catheter, made of Teflon or other synthetic material, slides over and off the needle. The flash chamber is located behind the needle, and will fill with blood upon entry into the vein to confirm proper placement. Finger grips on the sides of the flash chamber allow the device to be held securely in the hand. 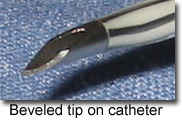
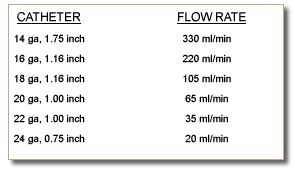
IV catheters come in various sizes. Two parameters must be considered, gauge and length. Gauge refers to the external diameter of the catheter, with smaller gauges (e.g. 14 ga) representing larger diameters than larger gauges (e.g. 20 ga). Catheters with larger gauges and shorter lengths allow for faster infusion of fluids. 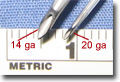 Ultimately, the appropriate catheter size will depend upon multiple factors. These include age of the patient (e.g. infant vs. adult); purpose of IV access (e.g. fluid resuscitation in a trauma patient vs. a "maintenance" line in a medical patient), and the quality of the patient's veins (e.g. the veins of a young healthy adult will usually accomodate a larger catheter than those of a debilitated elderly patient. The chart can be used as a rough guide. Safety Features Transmission of blood-borne viruses to health care workers (HCWs) is a topic of great importance. The CDC estimates that there are over 300,000 percutaneous exposures per year to HCWs (CDC abstracts). The catheters used at our institution feature a retractable needle and flash chamber that retract into a safety chamber when the user presses a button. This system prevents needlestick injuries by covering the sharp end of the needle once it has been used. 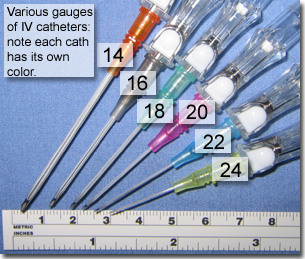
What are age-specific IV catheter requirements? 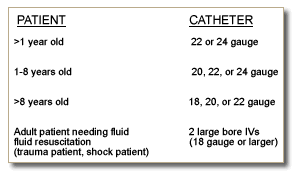
What are the different type of intravenous fluids for human needs? Colloids Crystalloids
Normal saline 5% Dextrose in water Intravenous Solutions In most cases, an intravenous solution will infused through the intravenous catheter. (Occasionally, a saline "lock" will be placed instead of infusing fluids.) There is a wide variety of IV fluids available, and a full discussion on the rationale for choosing an appropriate fluid is beyond the scope of this chapter. In brief, the clinician must decide on the tonicity of the solution as well as any additives, such as potassium or dextrose.  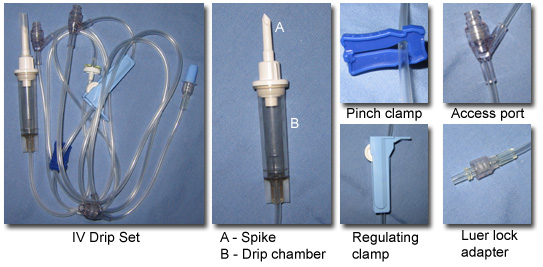
Drip Sets The IV solution is attached to the IV catheter via IV tubing, or a "drip set". While many types of drip sets exist, all share common components. These include a "spike" that is inserted into the IV solution bag; a drip chamber, which collects fluid as it drains from the bag; a "pinch clamp" which can be used to stop flow; a "regulating clamp" that is used to control the rate of infusion; a various number of access ports which are used to administer intravenous medications; and a Luer lock adapater which attaches to the IV catheter. There are many different type of drip sets available, and the clinician must be vigilant to choose the appropriate tubing for the specific indication. "Macro" drip sets deliver 1 cc of solution for every 10 drops of fluid that falls from the bag into the drip chamber. Macro drip sets are used when a relatively large volume of fluid must be administered. "Micro" drip sets deliver 1 cc in every 60 drops, and are used when smaller fluid volumes or precise dosages are required, such as in pediatrics and in delivering intravenous medications. Special drip sets containing filters are required for blood transfusions. 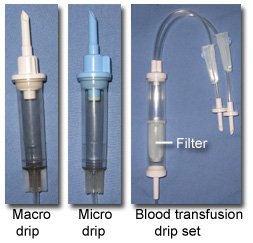 What potential sites should you utilize for human peripheral intravenous access? 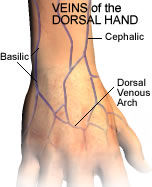 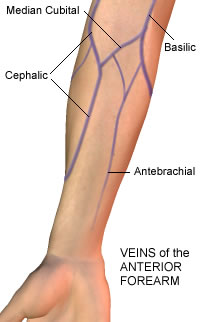 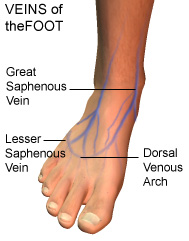 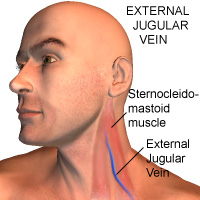 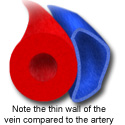
Successful cannulation of a peripheral vein requires proper site selection, as well as knowledge of the gross anatomy of a vein. Anatomy of a Vein Veins are thin walled-structures that lack the thick, circumferential smooth muscular layer that is present in arteries. As such, peripheral veins may collapse and may be difficult to cannulate (or even locate) in patients with hypovolemia, low blood pressure, etc. Venous return to the heart is dependent upon contraction of regional skeletal muscle (e.g. the gastrocnemius and soleus in the lower leg.) Additionally, many veins contain valves that prevent retrograde flow of blood. ( Moore, KL) If the intravenous catheter abuts one of these valves, flow of intravenous solution may be occluded. (Similiarly, valves can interfere with phlebotomy.) Successful cannulation of a peripheral vein requires proper site selection, as well as knowledge of the gross anatomy of a vein. Anatomy of a Vein Potential IV Sites Anatomy of a Vein Veins are thin walled-structures that lack the thick, circumferential smooth muscular layer that is present in arteries. As such, peripheral veins may collapse and may be difficult to cannulate (or even locate) in patients with hypovolemia, low blood pressure, etc. Venous return to the heart is dependent upon contraction of regional skeletal muscle (e.g. the gastrocnemius and soleus in the lower leg.) Additionally, many veins contain valves that prevent retrograde flow of blood. ( Moore, KL) If the intravenous catheter abuts one of these valves, flow of intravenous solution may be occluded. (Similiarly, valves can interfere with phlebotomy.) Potenital IV Sites General Concepts | Upper Extremity | Lower Extremity | External Jugular General Concepts The identification of the optimal site involves both visual and tactile exploration. The vein may be visible as a blue-green subcutaneous structure. It may “pop out” as it engorges with blood or merely be palpable as a springy canal coursing between the soft tissues. Given the wide variation in anatomic location of superificial veins, purely "blind" attempts, without visual or palpable landmarks, are highly unlikely to be successful and should be discouraged except in emergent situations. Ideally target a good sized vein with a straight segment at least the length of the catheter. For elective placement, site consideration should include: * Ease of access * Use of the non-dominant extremity * Avoiding joint areas * Avoiding use of the lower extremities * See the Contraindications section for other sites to avoid. Upper Extremity In most situations, intravenous catheters are inserted in the antecubital fossa, the forearm, the wrist, or the dorsum of the hand. The three main veins of the antecubital fossa (the cephalic, basilic, and median cubital) are frequently used. These veins are usually large, easy to find, and accomodating of larger IV catheters. Thus, they are ideal sites when large amounts of fluids must be administered. However, their location in a flexor region is a drawback, as bending of the elbow can be uncomfortable to the patient and may occlude the flow of the intravenous solution. Cannulation of the cephalic, basilic, or other unnamed veins of the forearm is preferrable. The veins in the dorsal hand may be utilized if large bore access (18 gauge or larger) is not required. Care must be taken to find a vein that is straight and will accept the entire length of the catheter. The portion of the cephalic vein in the region of the radial styloid is commonly known as the "student's" or "intern's" vein, as it is often a large, straight vein that is easy to cannulate Lower Extremity Cannulation of the veins of the feet is not ideal. ***ADD REFERENCES*** Insertion can be quite painful, and the catheter may cause more discomfort than if it were started in the hand or forearm. Additionally, IV catheters placed in the feet are more likely to become infected, to not flow properly, and are more likely to produce phlebitis. The great saphenous vein runs anteriorly to the medial malleolus, and may be accessed via a peripheral venous cutdown in emergent situations. The lesser saphenous vein runs along the lateral aspect of the foot. These two veins converge medially to form the dorsal venous arch. There are numerous unnamed vessels that are branches of these veins. (Clemente) Any vein in the foot large enough to accept the IV catheter may be used if necessary. External Jugular The external jugular ("EJ") vein can be cannulated if necessary. It orginates near the angle of the mandible, and courses over the sternocleidomastiod muscle. Proximal to the clavicle, the EJ dives into the subcutaneous tissue, eventually emptying into the subclavian vein. (Moore) The EJ is a large vein that can accomodate a large bore IV catheter (18 gauge or larger), in most patients. It is especially useful in patients with poor access in the arms who require a large volume of fluid. Additionally, the EJ is often engorged in patients with heart failure and provides an alternative in these patients if other venous access sites are not available. Please refer to the Alternatives section for further discussion on utilizing the external jugular vein. Successful completion of any procedure requires careful preparation. Attention to patient positioning and a priori collection of needed equipment is mandatory. Additionally, predicting difficult access and the use of techniques to aid vasodilation will greatly facilitate successful cannulation. The use of topical anesthetics may be useful in some populations, especially in pediatric patients. How should the patient be positioned during peripheral intravenous access? Patient Positioning 
As with any procedure, positioning of both the patient and the performer should be optimized. The patient should be seated or in a reclining position for comfort and safety. Immobilize the extremity, particularly for pediatric or uncooperative patients. Keep the extremity in full extension to make the vein taut, and place the intended cannulation site in a dependant position to engorge the vein. Predicting Difficult Access and Promoting Vasodilation Difficult Access Conditions that may predict difficult access include: * Dehydration/intravascular depletion * Chronic illness with venous scarring from frequent IV access * IV drug use with venous scarring * Obesity * Significant edema * Tortuous, fragile vessels due to advanced age * Thin vessel walls due to age, steroid use, certain disease conditions When presented with these situations, using the vasodilating techniques below may facilitate cannulation. If you are unsuccessful, Alternative Techniques may be required. Promoting Vasodilation Tourniquets should always be used when drawing blood or starting an IV. The tourniquet prevents venous return of blood, causing the vessel to dilate. If a suitable vein is not identified after the application of a tourniquet, having the patient hold the extremity in a dependent fashion will also help to engorge the vessel. Lenhardt and associates showed in a randomized trial that actively warming patient's hands with a warming mitt prior to cannulation reduced the time needed to complete the procedure and increased success rates. (Lenhardt, 2002) While these warming mitts will not likely be available at your institution, cheap and conveinent alternatives (such as having the patient hold the hand in a bowl of warm water, or applying a heating blanket or hot-water bottle) will likey have the same effect. Topical Anesthesia While anesthesia is not routinely utilized for intravenous cannulation, its use should be considered in special situations. Topical anesthetics are often used for venepuncture on children, to reduce anxiety and pain. (Arrowsmith) 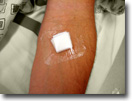 EMLA (eutectic mixture of local anesthetics) cream contains 2.5% lidocaine and 2.5% prilocaine. It is applied as a thick dollop of cream to the area of venepuncture, and then covered with an occlusive dressing such as Tegaderm. While it provides excellent anesthesia, it must remain on the skin for 60 minutes prior to the procedure to achieve maximum tissue preparation. (Wong) EMLA is extemely safe to use, but it should not be left on for more than two hours. Cases of methemoglobinemia have been reported (Hahn; Jakobson), however these are exceedingly rare and in most cases involved large doses of EMLA which were in contact with the skin for an extended period of time. LET (lidocaine 4%, epinephrine 0.1%, tetracaine 0.5%) can also be used in a similar fasion to EMLA. It too is generally safe, however should not be used on areas of the body without collateral circulation (such as the fingers, toes, ears and penis) because the epinephrine can cause local tissue ischemia. This is more of a concern when LET is used on lacerations. Explain the Procedure Explain the procedure to the patient. Tell the patient that the procedure may be mildy painful, but is brief. Ask that he / she hold the extemity completely still until the completion of the cannulation. Take time to answer any questions that the patient might have. The patient should be laying in the bed, with the opposite bed rail up, to prevent injury should the patient faint during the procedure. Gather Your Equipment Prior to beginning the procedure, gather all the required equipment. Once the cannula has been inserted, it will be attached to a connecting tubing. This can be flushed with saline and secured to the arm without intravenous fluids attached (i.e. a "saline lock".) If IV fluids are going to be infused, the bag of fluid will need to be attached to IV tubing (a "drip set") prior to the procedure. To "spike" the IV bag, first remove the plug from the bottom of the bag. Next, remove the protective cap from the end of the IV tubing, and firmly insert the sharp spike into the bag. Squeeze the drip chamber with your fingers until it is halfway full of fluid. Finally, open all clamps and allow the solution to course the tubing, flushing all air out of the line. Once this is done, tighten the regulating clamp again. Hang the bag on an IV pole. Care should be taken not to contaminate the end of the tubing. At some institutions, a connector tubing is customarily attached to the hub of the catheter. This tubing can be flushed with saline and secured to the extremity, and functions as a "saline lock", which maintains intravenous access without infusing fluids. When needed, medications can be administered directly into the connector tubing, or IV tubing can be attached to the connector to infuse fluids. If you are using a connector, it should be pre-flushed with normal saline to prevent air from entering the bloodstream. If phlebotomy is to be performed at the same time of catheter insertion, the connector should NOT be flushed, to prevent dilution of the blood sample. (See below for more information.) After selecting the site of insertion, a tourniquet should be applied to the extemity. This should be placed tight enough to engorge the vein, but not so tight that it causes the patient undue pain. If the vein fails to engorge, the extremity should be held in a dependent fashion, or warmed, as detailed in the Preparation section. The site should then be cleansed with an alcohol prep or povidone iodine swab. Use a circular motion, working your ways outwards from the site. Is alcohol is used, a moderate amount of friction should be applied, and the area should be rubbed for 60 seconds. A quick swipe is simply not effective. If iodine is to be used, it should be applied and allowed to dry for at least 30 seconds, and then wiped cleaned with an alcohol prep. Insert and Advance Catheter 1. Apply distal traction to the vein by using your non-dominant thumb. This is an imporant point that is often overlooked. Traction stabilizes the vein and prevents it from "rolling" during the insertion sequence. 2. The angiocatheter is gripped between the thumb and middle finger of the dominant hand. 3. The needle is inserted bevel-up. The initial angle of entry should be approximately 15-30 degrees. 4. Successful entry into the vessel is indicated by return of blood into the flash chamber. 5. Lower the angle of the angiocatheter, so that the catheter can be advanced in a plane as close to parallel to the vein as possible. This prevents the catheter from penetrating the posterior wall of the vein and infiltration of the IV. 6. Holding the hub of the plastic catheter with your index finger, the needle is withdrawn several millimeters. This covers the tip of the needle with the plastic catheter, which also guards against puncturing the posterior wall of the vein. 7. The catheter is pushed over the needle with the index finger, until the hub of the catheter abuts the skin. Two points deserve special consideration. First, it is the plastic catheter, NOT THE NEEDLE, that should be advanced into the vein. If the sharp tip of the needle is the leading point, vessel injury and resultant infiltration is likely. Secondly, the catheter should never be forced into the vein. If resistance is met, do not advance the catheter, and consider one of the troubleshooting measures listed below. Attach tubing / phlebotomy / Flush 1. Once the catheter is fully advanced, the traction can be released. Then, use the thumb and index finger of your non-dominant hand to hold the hub of the catheter. The other fingers are used to tamponade the vein, just beyond the tip of the catheter, to prevent blood from leaking out. 2. Remove the needle, and retract the needle (if it is so equipped.) 3. Attach the connecting tubing and apply a dressing (e.g. Tegaderm; tape may also be used.) 4. Blood may drawn at this point by attaching a vacutainer to the connecting tubing. (Please refer to the Phlebotomy chapter for further details.) Remember, if you are planning on drawing blood, the connector tubing should NOT be pre-flushed with saline to prevent dilution of the sample. 5. Remove the tourniquet. 5. Flush the line with normal saline. If the line does not flush easily, it may not be patent or may have infiltrated. See the troubleshooting section below for measures that may be tried. Final steps 1. Tape the connecting tubing to the skin. A loop ("U" shape) should be incorporated to prevent any tension placed on the line from pulling out the catheter. 2. IV fluids may be attached to the connecting tubing, if desired. 3. Carefully throw all sharps away in an approved sharps bucket or box. Troubleshooting Confirmation of Placement Proper IV placement is confirmed by a smooth saline flush without evidence of extravasation into the subcutaneous tissues. The ability to draw blood provides further confimation but is not a requirement since blood flow may be obstructed by a valve or from vein collapse due to suction. Infiltration Infiltration occurs when the vein is damaged during insertion and the infused fluid flows into the subcutaneous tissues instead of the vein. Infiltration has occured if a subcutaneous mass occurs during flushing or infusion of fluids; also, the line will be hard to flush and / or fluid from an IV bag will not flow. If infiltration occurs, the catheter must be removed and another attempt should be pursued. Refer to the Complications section for more information on cofirmation of placement and infiltration. Inability to advance catheter Occasionally it will be difficult to advance the catheter into the vein, despite a good flashback of blood during initial venepuncture. This can occur due to a venous valve, or to a tortuous vein. The catheter should never be forced into the vein, and this is likely to damage the vessel and cause infiltration. Several tricks are available in this situation: * Vary the amount of traction placed on the vein. First, try to pull the vein a bit tauter and advance the catheter. If unsuccessful, traction can be reduced (or even released) and further attempts at advancement can be pursued. * "Float" the catheter in. If the catheter can be partially advanced but meets resistance before insertion is completed, infusing saline through the line (via a flush or IV fluids) during advancement may facilitate passage. (The fluids act to distend the vessel and opens valves.) Excessive pressure should not be used in order to prevent infiltration. * Secure the catheter while it is partially inserted. If a long cather is used (1" or longer) it may be possible to have a patent line with only part of the catheter in the vein. This is not ideal and should not be relied upon unless other access is not available. If this method is chosen, free flow of fluids and absence of infiltation must be assured, and extra care should be taken in securing the line. Peripheral venous catheterization is a relatively safe procedure. Many of the complications listed below are more common with central venous catheters. However, knowledge of these complications is essential in order to recognize problems when they occur. Early Complications Infiltration | Arterial Placement | Air Embolism | Catheter Fracture & Embolism Infiltration and Extravasation Infiltration of the IV occurs when the tip becomes dislodged from the vessel lumen. This complication should be suspected when the intravenous fluid flows poorly, if the line is difficult to flush, if the automated pump sounds an alarm, or if the patient complains of pain. Infiltration can become a serious situation if toxic fluids are being administered through the line. These include hypertonic agents, cytotoxic agents, and vasopressors. Vasopressors, such as norepinephrine or dopamine extravasate into local tissues from an infiltrative line, severe tissue necrosis may result. This can be treated by injecting five cc phentolamine mixed with five cc of saline into the subcutaneous tissues with a small gauge needle. It can be difficult at times to confirm that an intravenous catheter is actually within the lumen. Backflow of blood into the intravenous tubing upon the application of negative pressure (e.g. withdrawing on a syringe attached to the catheter) is not a reliable indicator, as the tip of the catheter may be partially in and partially out of the vessel lumen. Conversely, the absence of backflow does not necessarily indicate catheter malposition, as the tip of the needle may intraluminal but adjacent to a valve or vessel wall. The most reliable method to confirm intraluminal placement, and to exclude infiltration, is to apply tourniquet proximal to the catheter site tight enough to restrict venous flow. A catheter in the appropriate position will cease to flow in this situation, whereas an infiltrated line may continue to flow. Arterial Placement Peripheral catheters may accidentally be inserted into arteries instead of veins. This would occur most commonly in the antecubital fossa, with the catheter entering the brachial artery instead of the median cubital or basilic vein. Arterial cannulation is distinguished by arterial flow (pumping) of blood, which will also be a bright scarlet red if patient is not hypoxic. In this situation phlebotomy may still be performed but the catheter should subsequently be removed. Pressure should be placed over the site for one full minute, longer if patient is coagulopathic. Air embolism Air embolism is more commonly seen with central venous catheters, however may also occur with peripheral catheters. If air is introduced into the vascular system, it may accumulate and cause complications such as blockage of the right side of the vascular system (i.e. venous) leading to outflow obstruction of the right ventricle and pulmonary arteries. Possible symtpoms include impaired gas exchange, hypotension, and circulatory collapse. (Breen 2000, Feied 2002) Left-sided (arterial) obstruction may also occur, if an atrial or ventricular septal defect is present. Obstruction of the coronary or cerebral arteries by air can lead to myocardial infarction and acute stroke, respectively. While it is classically taught that 5 ml / kg of air is needed to produce an "air lock" of the right ventricle and pulmonary artery, circulatory collapse has been reported with as little as 20cc of air. Should signicant air embolization occur, the patient should be placed in a left lateral recumbent position to trap the air in the right atrium. Available interventions include aspiration via a central venous catheter, hyperbaric treatment, and in severe cases, thoractomy. To prevent air embolism, all tubing should be flushed prior to utilization. Additionally, all connections must be tight, and fluid bags should not be allowed to completely empty before replacement. If this occurs, the line should be removed from the catheter and re-flushed. Catheter fracture and embolism Catheter embolism is a rare complication of peripheral intravenous catheters. If the tip of the synthetic catheter is sheared off, it may potentially embolize and travel proximally in the circulation. This sequence of events occurs when the needle is withdrawn from the catheter and then reinserted. Therefore, once the needle is removed it should never be reinserted. (Weinstein 2001) Catheter embolism carries a high complication rate (up to 49%), and fluoroscopic catheterization and retrieval of the foreign body is usually recommended. 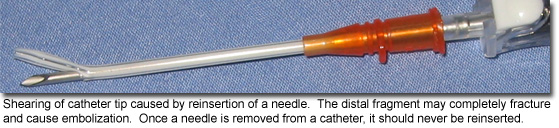 Late Complications Infection | Thrombophlebitis | Phlebitis Infection Infection is a common complication of intravenous therapy. Intravenous catheters can lead to local infection as well as bacteremia from several mechanisms. The most common source of infection is skin flora, which migrates distally down the intravenous catheter. Coagulase negative staph and staphylococcus aureus, as well as yeasts (e.g. candida), are frequent isolates responsible for infection. (Garrison 1994) Other sources of infection include hematogenous spread from distant infections, as well as infected solutions or other equipment. Gram negative bacilli are often associated in these situations. (Sitges 1999) It should be noted that patients at the extremes of age (less than one year or greater than 60 years), those with infections at remote sites, and those with underlying immunodeficiency disorders are at greater risk for iatrogenic catheter related infections. The diagnosis of infection related to peripheral venous catheters is relatively straightforward. In most cases, localized inflammation, induration, and erythema will be present. Cultures of the catheter tip, which are often useful in regards to central venous catheter-related infections, are not routinely required for peripheral lines. More severe sequelae from line infections (such as septic shock, sustained bacteremia, metastatic infection, and endocarditis) are usually associated with the use of central venous catheters. The peripheral venous catheter should be removed at once if infection is suspected. the decision to begin antibiotics must be made on an individual basis. Antibiotics with activity against gram positive organisms (such as first-generation cephalosporins, penicillin, or vancomycin) should be initiated if there is evidence of systemic infection or spreading local infection. Catheter related infections are best controlled by meticulous attention to sterility and preparation during insertion. Alcohol preps are adequate only if done appropriately (i.e. applied with a moderate amount of friction for one minute.) A quick swipe with an alcohol prep simply not effective. Iodine-based solutions are more effective than alcohol, and should be used if the patient is not allergic to iodine. These preps are most effective if allowed to dry on the skin for at least 30 seconds. Thrombophlebitis Peripheral venous thrombophlebitis, an extremely common complication, is heralded by pain, erythema, swelling, and a palpable cord along the course of the cannulated vein. Thrombophlebitis is caused by local damage to the venous wall, and resultant inflammation and thrombus formation. There are multiple risk factors for the development of thrombophlebitis. The length of duration of cannulation is proportional to the risk of thrombophlebitis. Catheters placed in the veins that overlay joints are more likely to cause thrombophlebitis, as motion of the joint can cause frictional trauma between the endothelium and the catheter. Stagnant blood flow in the lower extremities makes veins in this location more likely to develop thrombophlebitis. Numerous intravenous fluid solutions, such as potassium chloride, barbiturates, phenytoin, and chemotherapeutic agents, are known to cause endothelial damage and inflammation. Finally, poor technique and multiple attempts lead to vascular damage and thrombophlebitis. Should thrombophlebitis developed, the intravenous catheter should be removed immediately. The most circumstances, no treatment is needed other than elevation of the extremity and the application of warm compresses. Antibiotics may be required if there is evidence of surrounding infection. Thrombophlebitis can be prevented by following these recommendations: * Utilizing a septic technique * Using of alcohol or iodine prior to insertion * Securing catheter appropriately * Avoiding lower extremity insertion sites * Inspecting for thrombophlebitis daily * Replacing catheters every 72 hours * Avoiding unnecessary tubing changing * Replacing dressings as needed. It is the clinician's responsibility to 1) be knowledgable of the equipment used in his/her environment, and 2) use that equipment in the appropriate manner. When should you start an on-the-spot intravenous line? Is there hypotension due to blood loos? Do you think there is neurogenic shock after trauma? If yes, follow these guidelines. Here are further guidelines. If there is blood loss with hypotension. In case of cardiopulmonary arrest. Cardiopulmonary resuscitation if required. |